Thursday, October 21, 2010

Pottery Barn Inspired Pumpkins

After seeing Lindsay's post over at Living With Lindsay, I had to try these cuties out myself!  You can buy the kits to make these pumpkins on sale for $10 each, or you can make all four of them yourself for about $3 worth of material. You could also make up your own designs and see how they work out, the materials are so cheap, it's hard to go wrong!

Pottery Barn Kids

This was a great project to do with the kids.  Mine are a little too young to do the intricate cuts, but they were more than happy to help stick on the pieces.  It's getting close to carving time this year, but if we remember to do this next year, it will help keep my boys happy between the time we pick out pumpkins and when it's time to carve them.

Lindsay has provided her own template on her site with directions.  Head on over to Living with Lindsay to see the step by step and print your own patterns!

These are our personal pumpkins, aren't they sweet?!  We still need to do the spider and skull.
And just when I thought they couldn't be cuter...

Wednesday, October 13, 2010

Pumpkin Craft Roundup!

With all the pumpkin crafts to be found this time of year in blogland, I thought I'd link and show the projects that I've done with a few quick how-tos. They are quick and easy projects that are great to have your kids help out with, and can mostly be done with household items.  Make your own to decorate your house with for the rest of the fall season!

Wood Scrap Pumpkins
With all the wood projects we worked on over the summer, we have a nice scrap pile going in the garage.  These pumpkins (I found them first at It's a Daisy Day!) are made of leftover 2x4s painted orange with some fallen sticks for stems hot glued on, then a little wire, raffia and fabric bow to finish them off.  These would be cute with jack-o-lantern faces painted on as well! 


Toilet Paper Pumpkins
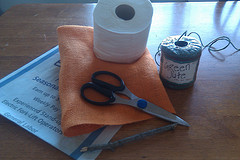
I found this super quick and cute project over at The Sweet Life, although they seem to be found everywhere!  My boys helped me make a few of these, I love them because I already had everything needed to make them, and when the season is over, there is no need to store them. 

You will need a roll of toilet paper, sheet of newspaper, about a 2' square of fall fabric (I used orange burlap), a stick, and some raffia or twine.


First, wrap the toilet paper in the newspaper, tucking the paper into one end of the roll.  Push it down in there really good to make sure there is still some room in the roll.


Next, repeat the last step with your fabric, fold the fabric under itself if it wants to poke out. Just mess with it until it looks the way you want to.  If you're not happy with it, just unwrap and start over.  :)  Once you are happy with the fabric covering, push the stick into the fabric to make a stem.  You could glue it in if you like, but mine fit down in the fabric tightly so I didn't think it was necessary.  I tied green twine around my stem so it would look leafy, but you can use whatever you like to embellish.


Dryer Duct Pumpkins
This was the only project I had to purchase anything for, and these are so cute, I thought it was worth it!  I found this project over at House of Hepworths, which is one of my favorite blogs.  Looking at the finished product, you would never think they were made of dryer ducting!  I paid $10 for 8 feet of ducting at Lowes, which should make 3-4 pumpkins, so not too spendy really.  Other than the ducting, you will also need spray paint, scissors, wire cutters, hot glue gun and glue, cinnamon sticks, and any other embellishments you like to add.


Cut a length of about 24" of flexible type dryer ducting, cutting through the wire with a wire cutter.  Tuck in the messy edges.  Have your toddler make sure there is nothing inside the tube for you.  :)  Curl the ducting into a circle and secure with hot glue. See where this is going? :)


Spray the ducting orange (red or green would also be really cute for apples!) and let dry. Hot glue cinnamon sticks or a piece of a branch for a stem then add raffia or twine if you like.  So easy and looks just like a pumpkin!


Tuesday, October 12, 2010

Magic Swiffer Trick

Love the convenience of your Swiffer (or similar mop) but hate all the waste and expense?  I have a few tips for you!

I own a Swiffer WetJet (purchased cheaply with coupons a few years ago!) and I love how easy it is to grab and clean up my floors quickly, but I have a confession to make.  My WetJet came in a kit with two cloths and one bottle of solution, and after those supplies were gone, the Swiffer sat unused in my closet for about a year.  Manufacturers put out great coupons for the starter kit, knowing they will get your money on the refills.  I could not bring my thrifty self to spend so much money on those single use cloths that end up in the landfill.

One day during my crochet phase, I came across a pattern for a reusable cotton sleeve to fit the bottom of the mop, and I quickly got to work making a few, which I still use to this day!  The pattern I found was ribbed, so it works even better than the cloths at scrubbing sticky or dried stuff off the floor.  It fits the bottom of the mop like a sock, so you just slip it on and go to town.  It is relatively thick so it can be turned inside out and used again before washing.  When you're done, just toss in the wash and soon you're good to use it again.  I will link to the pattern that I used for my "Swiffer Socks" at the end of this post so everyone else can make one too!  If you search the web, you will find many patterns for both knit and crochet, just be sure to use cotton, I find it more durable, and the nasties can be more easily washed out. And I know mine looks dirty, but I promise it's clean, it has just seen a lot of use!


Now, not to say that I'm a fantastic crochet-er, because I am far from it, but there was a time I couldn't crochet a stitch, so I also have an easy solution that works almost as well as the crocheted cloths.  When my cloths are dirty, I take an old wash rag (anything works!),  fold it to the size of the mop head, and hold it on there with a few rubber bands.  Sometimes the rag flops around a bit, but it's cheap, effective, and reusable, so I can't complain too much.


I'm sure many of you have already discovered the hack for the cloths, but how about the solution?  Once I had my Swiffer slipcovers made up, I started using my mop again (yay!), but soon ran out of the cleaning solution.  For a while, I just sprayed the floor with my homemade cleaner and that worked fine, until I started searching for a way to reuse the bottle that came with the mop.  I came up with many results showing how to melt or drill a hole in the bottle to refill, but then you're left with a hole in the bottle for cleaner to leak out of, which didn't appeal to me considering I have two boys that like to "help" me clean.  Then, I came across this tip, and I have been using my modified bottle ever since! 

Here's how to modify your own WetJet cleaning solution bottle:

You will need
1 empty solution bottle
pan of simmering water
pot holder or towel
scissors or nail clippers
some sort of cleaner to refill the bottle with (I suggest a homemade cleaner suitable for your specific flooring type)

1) Turn the empty bottle upside down and put the cap into the simmering water for 1-2 minutes


2) Take the bottle out of the water and use a towel to twist off the cap, this might take a little force. (Please don't forget the towel, the lid is really hot!)


3) Inside the cap you will find little plastic ridges that grip the bottle making it hard to twist off the cap.  By simmering the cap, you have softened the plastic making it easy to twist off.  You can reheat the lid every time the bottle is empty, or clip those suckers off!  I used a pair of nail clippers, but small sharp scissors would work too.


4) Now just refill the bottle with your cleaner of choice, recap, and get to mopping!


Crochet Swiffer Sock Pattern